Category Archives: busing with babies

Bus chick preparedness, part IV (or, How to survive a birthday party at the lake)

Back in April, the Bus Fam attended the Healthy Kids Day extravaganza at Meredith Matthews YMCA. Among the SWAG we took home was this handy little “ouch pouch” from Group Health.

Ouch Pouch

It’s hard to tell from the photo, but it’s about the size and weight of a package of Kool Aid. Of course you know where it ended up.

A couple of weeks later, a family friend gave Chicklet and Busling a basket of Easter treats. It was a huge basket with tons of candy and fun, plastic toys—in other words, something we would never have bought for them ourselves. They were thrilled.

The best part from my perspective (given that the basket contained no chocolate), was this adorable little set of sand toys.

Bus-friendly beach set

It’s got everything kids like to play with at the beach—bucket, shovel, rake, sifter, sea-themed molds—but it takes up only slightly more space than a kid’s cup.

Which brings me to last Friday, the occasion of our little friend Miles’s first birthday party. Since the celebration was being held at Madrona Park on a sunny day, we wanted to be ready for beach fun. We traveled to the party (on the 2) with only the bus bag and one small additional bag, which contained: food to share, a gift (books, of course), the tiny beach set, towels, sun hats, and sun screen. We also carried an additional package (books again) for the first half of our journey. (We stopped at the post office on the way to mail a belated Father’s Day present to Busling’s Godfather.)

I digress.

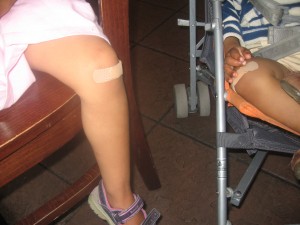
During the festivities, both Chicklet and Busling managed to take some pretty good spills. (They’re learning the hard way that running and sandals don’t mix.) Fortunately for them, their mama knows how to pack a bag.

Ouch!


Alki, here we come!

How riding the bus will make your kid smarter

One of the biggest benefits of riding transit with little ones is that you can actually pay attention to them while you travel. Instead of hollering in the general direction of the back seat (or worse, resorting to an in-vehicle entertainment system to keep order), PT parents can have meaningful, even educational, interactions with their little darlings. Here are some examples of brain- and bond-enhancing ways to use transit travel time.

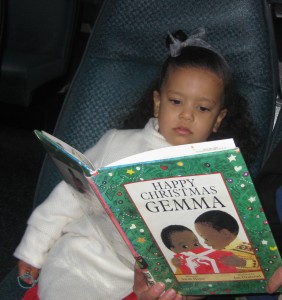
  • Read! Reading is a great PT pastime for children of any age. Research shows that reading to infants and young children helps with bonding, language development, and imagination. Books are also portable and compact—an essential addition to any parent’s bus bag.
  • Watch the world. Talk to your tiny ones about what’s going on outside the bus window, and they’ll learn to identify natural wonders (mountains, bodies of water), city landmarks, different types of vehicles, and various animals and plants. Bus time is also great for pointing out seasonal changes (leaves changing color in fall, tulips and daffodils coming up in spring) and explaining traffic rules.
  • Meet your community. What’s going on inside the bus is often at least as interesting as what’s outside. Infants love to look at faces, and babies who ride buses are exposed to a great variety of them. They learn early that people of different ages, shapes, and colors are part of their world. Older children will learn how to share space and how to interact politely with strangers. Being exposed to difference will help them develop empathy, or, at the very least, a more realistic picture of the world they live in.
  • Practice number/letter recognition. Long wait with a preschooler? Use the time to identify the route numbers that pass your stop, or practice reading the destination signs. (Kids who can identify letters can usually memorize simple letter combinations and sight “read” short words. Children who are working on phonics can practice sounding out the signs.) You can also make up games, such as putting the child in charge of telling you when your route arrives, or of finding all the routes with a certain number.
  • Learn to get around. Bus riding offers plenty of opportunities for school-age children to practice map and schedule reading and other skills, such as assessing direction of travel. Give your little BCiTs some trip planning/wayfinding responsibilities when you still travel together, and they’ll soon become experts at getting around town sans parents.
  • Talk. There’s nothing better for teaching, learning, or bonding than a respectful, reciprocal discussion between a parent and child. Transit rides and waits (not to mention the walks to and from stops and stations) are perfect for good, old-fashioned, heart-to-heart “tawks.”**

I am not naïve enough to believe that my children will always be thrilled about taking the bus every-dang-where. What I do know is that, so far, our bus time has been great for just about every aspect of their development. (Folks, for your sakes I have exercised restraint and not mentioned even one of their many demonstrations of genius.) It has also been great for our relationships. Bus time is as much about togetherness and adventure as it is about getting from point A to point B, and every time we travel, we create amazing memories. As I’ve said before, I could never trade that for easier access to the mall.

***

*Tip: Always carry a few tried and true favorites, but make sure to keep your selection fresh. The library is your friend.

**As my friend Aileen would say.

The sane person’s guide to taking kids on public transit

My latest for Grist:

Riding public transportation, as I’ve said before, is good for kids. And the presence of children on transit can enrich the experience for all riders. (Settle down, people! I said can.) So it’s unfortunate that the reality of taking little ones on buses and trains often proves so challenging — both for the folks bringing them and for those along for the ride.

[…]

So, what can we do to make taking kids on transit more enjoyable for everyone? A lot!

Read the rest…

Busing with two babies: one year later

This time last year, I was adjusting to busing with two babes. My first few months with a newborn and a two-year old were challenging, to say the least. But then, my little chip off the big chick stepped up and became a full-time walker, and our travels—Busling in the front pack, Chicklet on foot—got easy again.
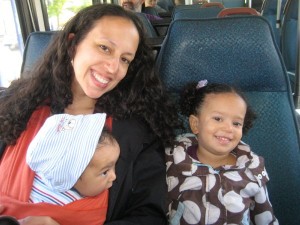
The good old days

Now, sweet Busling is growing up, and the old system isn’t working. These days, traveling alone* with two is, well, tough. It’s not the actual riding that’s the challenge (not to brag, but I could teach a class on managing children on transit); it’s the logistics. The wrangling, rushing, folding, hand-holding, stowing, storing. The paying while entering or leaving (and sometimes, while entering and leaving**), the finding space, the keeping dry.

What I’m really trying to say is, it’s the stroller.

Baby B has grown too big to be carried comfortably in a front pack (and has also developed a particular fondness for the phrase, “get down”). The carrier we have also works as a baby backpack, but I am incapable of getting him on or off my back without either assistance or a lot of time. Add to that the fact that neither of us is comfortable with the prospect of him being strapped to me for the duration of an outing, and you have a pretty decent argument for bringing along a stroller.

Except that bringing a stroller on a bus is just about the worst form of torture this bus parent can imagine.

For those who don’t know: KC Metro does not allow children in strollers on buses. (I’m embarrassed to admit that I have no idea why this rule exists, but I assume it has something to do with keeping the aisles clear.) What this means is that, if you’re traveling with a child in a stroller, you must remove the child from and completely collapse said stroller before entering the bus. (I’ve seen some parents do the child removing and stroller collapsing on the bus, but I don’t, for a number of reasons.)

Here’s a sample busing-with-two-and-a-stroller scenario:

1. Put baby in bus-friendly, umbrella-type stroller for the three-block walk*** to the stop. (Alternative: Put baby in front pack for the trip to the stop and carry or drag the folded stroller.)
2. Try to push stroller with one hand while using the other hand to hold on to three-year old. This leaves no hands to hold an umbrella if it is raining, which it almost always is.
3. Attempt to arrive at the stop with enough time for baby-removal/folding (Ever tried arriving anywhere early with two young children?), but not so much time that the three of you get soaked.
4. Remove baby from stroller while keeping a close eye on three-year old near very busy street.
5. When the bus arrives, carry baby, stroller, bag, and three-year old up bus steps—unless, that is, the bus gods bless you with a low-floor vehicle. (Alternatives: a)Allow three year-old to do the climbing herself and hold up the bus. b) Bring baby pack for on/off and add another item to keep track of and another step to the process.)
6. Pay (convenient bag tap—actually easy—yay Orca!).
7. Find space for everyone and an out-of-the-way place to stow the stroller.
8. Spend a few (sometimes many) minutes of quality time with the kids–usually reading books or discussing the goings-on outside the window.
9. Start preparing to repeat the process in reverse.
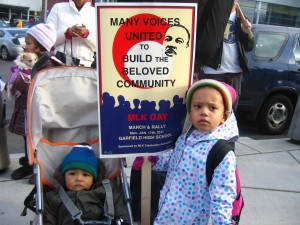
The new world: a walker and a rider

Because I so despise bringing a stroller on the bus, I spend a lot of time calculating whether it is worth it to me. I generally weigh the hassle of bringing it (if we have to transfer, how crowded the buses are likely to be) against my need for it at the other end. If we’re visiting someone’s home, I’m unlikely to need it. If we’re hitting several different downtown stores, I’m very likely to need it. (If I decide not to bring the stroller, I carry Busling in the front pack and endure the less-than-idealness.) Sometimes (actually often) both the hassle factor and the need factor are high. Add to this the many mitigating factors (rush hour? nap time?) and the fact that our backup travel options are also made more complex (or impossible) with two kids, and it adds up to way too much mental (and physical) energy invested in simply getting around. (I knew we should’ve moved near a Link station!)

Of course I know this challenge will pass. It will get better temporarily when the weather improves (Hello, August? It’s me, Bus Chick. I miss you!), and it will disappear entirely (to be replaced, I am sure, with new and different challenges) once Busling is old enough to walk several blocks on his own. Not that I’m rushing things. The years are flying by as it is. And, stroller hassles or not, I created some amazing baby-busing memories during this one.
***

* I should say, before you all start to think I’ve gone sour on the bus, that busing with two adults and two children is still a lot of fun—far more fun than I imagine driving with two adults and two children would be. And these days, busing alone with one child feels like a vacation.
**If you ride a route that originates outside of downtown but travels through it, you have to pay twice because of pay as you enter/pay as you leave drama. (If you’re not from Seattle: Don’t ask.) Of course, you don’t actually get charged twice—since you already have either a transfer or a pass—but it’s still a hassle.
***Distances vary, depending on which route we’re catching.
About that bus cake…

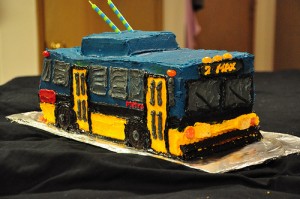
I recently chatted (via e-mail) with Nicole McGuire, the woman who made this amazing cake.

Here’s what she had to say about her kid’s bus obsession–and her work of genius:

Max’s love of buses began when he was about a year old with Joe taking him on trips when I was pregnant with our second child and too tired to go out and do anything. For some reason, Max just loved the bus from the start. By the time he was 14 or 15 months old he would literally shake and squeal with delight at the sight of an oncoming bus. He was a late talker, but his third spoken word was “buth!” (he hadn’t even said “daddy” or “mama” yet). We also live close to a busy intersection which services several bus routes, and so buses can be seen and heard at almost any time of the day out our window, so that probably contributed to the fascination.

As far as the cake went, I just wanted to make him something that I knew he would enjoy. He loves buses more than anything — except for Daddy — and I couldn’t make a cake in the shape of Dad. So, I got it in my head that I’d make him a bus cake. I had a vision of what I wanted it to look like, but I didn’t have any models to work from. I bought a book titled “Birthday Cakes for Kids” by Annie Rigg, hoping to find something to work off of. But unfortunately, there was nothing that resembled the image I had in my head. But I thought, “hey, how hard could it be?” and decided to take her cake recipe, thinking it would be sturdy enough to withstand shaping. It was; it worked beautifully.

Nicole was also generous enough to share her recipe. (It needs to be added to that cake cookbook!) I will definitely be trying it on a future birthday in our household. (Bus Nerd is next up, but he’s a pie man.) When I do, I’ll post photos (no matter how it turns out) here. If any of you try it before I do, be sure to report back.

Here’s the recipe for one 9×13 cake.
(I used 3 of these to get three 5.5″ x 13″ rectangles and then used the scraps to add the electric converter box on top. It really was a huge cake — it probably could have fed 30 people).

Annie Rigg’s Basic Yellow Cake:
3 sticks unsalted butter, at room temp
2 cups sugar
6 large eggs, beaten
2 teaspoons vanilla extract
3 cups cake flour
5 teaspoons baking powder
4-5 tablespoons milk, at room temp

Preheat the oven to 350ºF. Grease and place greased parchment paper in a 13×9 cake pan.

Cream the butter and sugar in electric mixer until pale, light and fluffy, about 2-3 mins. Very gradually add the beaten eggs, mixing well between each addition and scraping down the bowl with a spatula from time to time. Stir in the vanilla extract.

Sift together the flour and baking powder and add to the cake mixture in 2 batches, mixing until smooth. Add the milk and mix until smooth.

Pour into cake pan. Bake on the middle rack of preheated oven for 45 mins, or until a toothpick inserted in center comes out clean. Let the cake cool for ten minutes before turning out onto a wire cooling rack. Turn the cake right side up and let cool completely.

I used a Betty Crocker buttercream frosting — your favorite will do.

As the cakes were cooling, I mixed the food coloring into my frosting. I used the gel food coloring for more intense color (bought at a kitchen store, but I think you can find them at nicer grocery stores).
Blue + Green = Teal (for bus top)
Yellow + splash of Orange = Gold (for bus bottom and doors)
Black (for piping and line down center of bus)
Red (for small red stripe and metro writing)
Splash of Black = Grey (for windows)

Once the cakes were cool, I used a serrated knife to level the tops of the cakes so they stacked nicely. I cut them into 5.5″ by 12″ rectangles, being careful to save the remainders for the electric converter box that went on top. I put frosting in between the layers to cement them in place. Then I cut a little wedge off the back of the bus so it tapered ever so gently. I took two 1″ x 4″ scraps and put them side by side and on top of the cake with frosting to make the electric converter box. I tapered the sides of these (cut off little wedges on front and back sides) so they lay on the cake at a 45 degree angle. Then I crumb coated it. This is just a fancy way of saying that I put a layer of frosting around the whole cake and then stuck it in the fridge for about an hour so that the surface of the cake would be easier to frost and wouldn’t get little bits of cake everywhere. Then, I used some photos I found on google images as a guide and I frosted it. (One tip — I used both a small and large offset spatula to crumb coat and to frost). Teal on the top, gold on the bottom, black stripe down the middle, gray windows, etc. For the thin lines I put the frosting in a plastic pastry bag and snipped off the tip to pipe the frosting. The frosting took a good couple of hours.

I then stuck Oreos on for wheels (I cut circles into the cake so that the oreos would fit in and would be flush against the cake) and frosted black lines along the bottom as a bumper. For the front bumper I used black licorice vines. I used giant yellow gumdrops cut into rectangles for headlights, and cut the small circular tip off orange gumdrops for parking lights. I used black licorice ropes for window washers and orange jellybeans for the little lights on the top of the bus. I used the bottom of large gumdrops for the taillights, red jellybeans for the little lights on top in the back and a licorice allsort for the tailpipe. Then I put two long candles in for the electric poles.

Hooray for Nicole (coolest mom ever) and my new (third) favorite BCiT, Max!

Bus chick preparedness, part III (or, Anatomy of a bus bag)

As I’ve mentioned before, bags are important to bus types. After footwear, a bus rider’s bag is probably the single most important accessory (equipment?) she owns. And yet, it’s been years since I’ve had one that worked well for me. Since Chicklet was born, I’ve been looking (not actively, but still) for a bag with the following attributes:

• Ability to carry baby/kid stuff and adult stuff
• Simple, but with enough compartments to make frequently used items easy to access
• Professional in appearance (for those times I’m traveling without children)
• Comfortable to wear with a baby in a pack

I finally bought a new bag in December. I let go of the last requirement, since I won’t be wearing Busling much longer (more on that very soon), and since all the bags-for-baby-wearing options I found seemed impractical for other purposes, not especially easy to use, and, um, ugly. The new bag has adjustable straps, which are useful but not as sturdy as they could be. (The adjustable strap was actually the source of my beloved pre-baby bus bag’s demise.) And, though it’s professional and reasonably attractive, it’s definitely not my style. All that said, so far, I’m mostly satisfied.

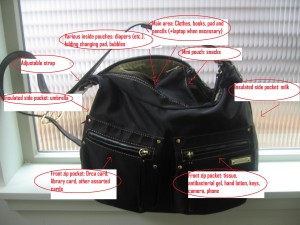
For those who’d like to know, here’s what I keep in it.

At least one compact, age-appropriate book for each child. Since books are our most-common form of ride entertainment, I tend to rotate them frequently. (Thanks, SPL!) I don’t usually bring toys because they take up space, are easily dropped (try picking up a block from the bus floor with a baby and a bag on your lap), and don’t really entertain an antsy child anyway. Instead of worrying about bringing a lot of distractions, I take advantage of the built-in distractions of the bus, scenery, and fellow riders. It does require some effort (more on this later as well) but has so far worked for me.
A small pad of paper and a box of erasable colored pencils for Chicklet. She uses them only occasionally when we’re out, but since they take up very little space and come in handy if I need to jot something down and my phone is not cooperating (see below), they’re worth including.
Bubbles! These are great for passing the time waiting outside and (again) compact and portable. Just be sure not to mix them with the main contents of your bag.
Non-perishable snacks. Busling is, for some reason, obsessed with raisins. Since they’re very portable and healthy (and also a favorite of Chicklet’s), they always go in the bag. I also usually bring some kind of granola/energy bars for Chicklet. These I save for times when she’s walked an especially long distance or we’ve stayed out longer than expected. She thinks of them as dessert, so they work well as bribes—I mean, good behavior encouragement. Oh, and sometimes I bring animal-shaped mini crackers. And teething biscuits.
Diapers and associated paraphernalia (folding changing pad, wipes, lined “wet bag”)
Minimal extra clothing. I bring pants and underwear for Chicklet—just in case a restroom emergency strikes when we’re not near a restroom—and an undershirt and one-piece outfit for Busling. (Chicklet now has her own bus bag and could theoretically carry her own extra clothes, but since we don’t always bring her bag, it works best for me to keep them in mine.) I’ve never actually had to use the extra garments, but I’m sure I’d have a need if I ever traveled without them.
Umbrella. Yes, real Seattleites do carry them. Mine’s compact and has a cover (so I can avoid loss/wet-umbrella on the seat bus foul) and return it to my bag when wet. The good news is, my new bag has two waterproof, insulated hidden side pockets, so it’s OK if I lose the cover.
Smart(ish) phone. My phone isn’t fancy (and honestly doesn’t work very well), but I mostly only use to tell time and find out when the next bus is coming. And, of course, for the occasional call.
Wallet. It’s got the usual stuff: money, ID, library card, Orca card, and et cetera. I keep it in a very snug front pocket (tough for a thief to slip out) but perfect for effortless hip-taps on the Orca card reader.
Keys
Antibacterial gel. Ahem.
Hand lotion
Mini package of tissues
Chapstick
Gum. Hey, fellow passengers appreciate attention to these matters.
Rain bonnet–just in case I put some effort into my hair
Digital camera. You never know when you’ll pass a guy with a snowboard checking a schedule.

I keep this stuff in my bag at all times (restocking when necessary) and add only milk (which I keep in the other insulated side pocket) and a thermos of water at the last minute. This makes the ordeal of getting out of the house with two kids as simple as it can be.

All of this fits well and is easy to access, and the bag is not at all heavy. If I’m going out alone (to a meeting or some other business-related event), I can easily add my laptop without reconfiguring.

Your turn. What’s in your bus bag?